Integrate VMware AirWatch Enterprise Mobility Management with VMware NSX Network Virtualization and Security Platform to extend security policies from the data center to mobile application endpoints. VMware AirWatch – NSX Integration brings speed and simplicity to networking and micro-segmentation capabilities. By creating policies that dynamically follow mobile applications, it eliminates the need to do time-consuming network provisioning. Keep reading to learn how to integrate NSX with VMware AirWatch.

Next Level Per-App VPN
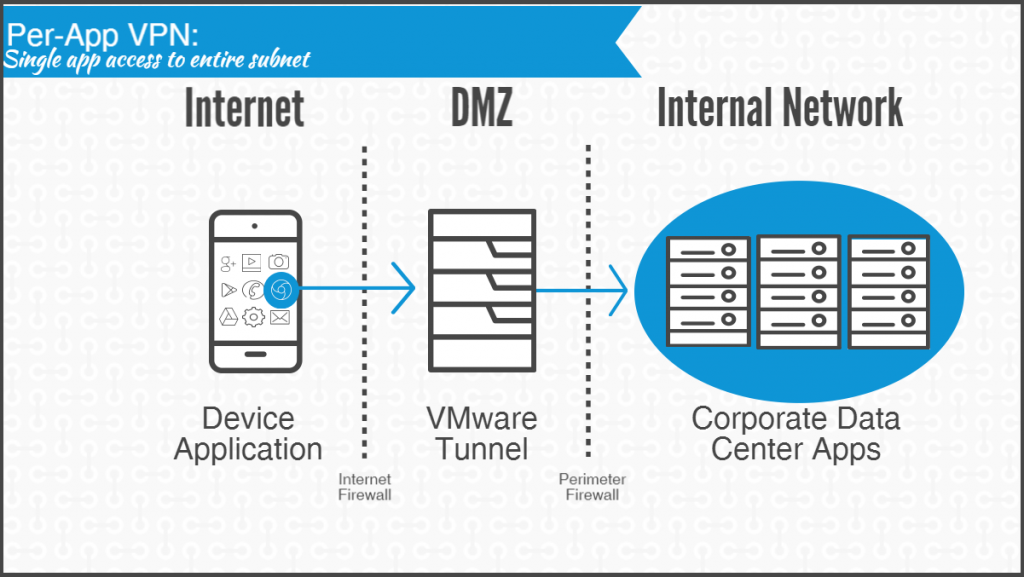
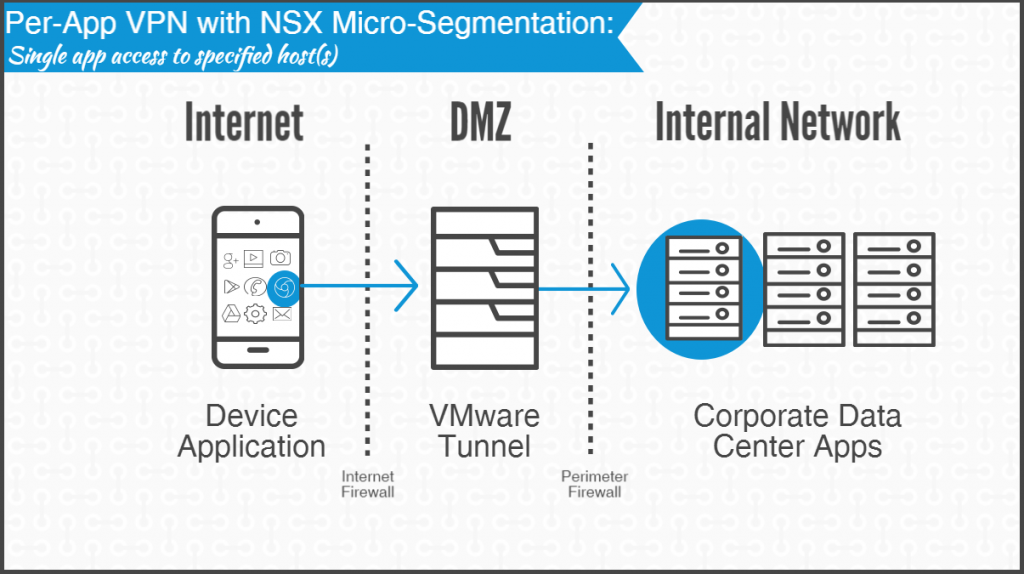
While per-app VPN addresses some of the security concerns of device-level VPN, it still exposes all the domain’s endpoints and services to an application. In comparison,micro-segmentation takes endpoint management to the next level, restricting application-level access to a specified endpoint on the datacenter.
[Related: VMware AirWatch 101: Per-App VPN]
What is NSX Micro-Segmentation?
NSX micro-segmentation is a logical, bi-directional firewall that monitors inbound and outbound access controls for individual endpoints. It uses the NSX virtualization tool, making it a streamlined, cost-effective alternative to a physical firewall.
VMware AirWatch – NSX Integration Health Care Use Case
Consider a doctor referencing patient health records from an enterprise health app. In this use case, only the health app, and not any of the device’s other applications, can establish a per-app VPN connection. Then, micro-segmentation dictates a designated endpoint for the health app. In this case, a patient database.
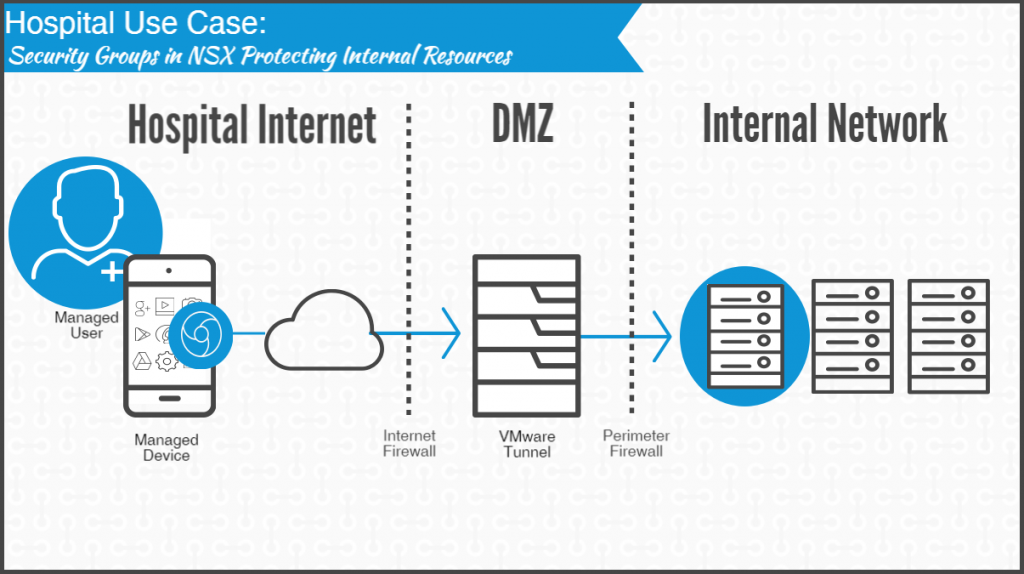
This level of restriction means that the healthcare app cannot access the e-mail server, an inventory database, or other unrelated services. The application’s assigned groups also mean that data access gets filtered on an employee level as well. Nurses, or doctors from a different department using the same health app cannot access the specified database without permission.
Additional Use Cases
- Enhanced network security and granular controls for mobile workflows
- Accelerated digital workspace and BYOD deployments
- Policy defined network access for mobile apps and users
- Reduced mobile access footprint to data center minimizing attack surface
- Accelerated mobile app delivery, testing and automation
VMware AirWatch – NSX Integration Solution Overview
Starting with a sucessfully installed instance of NSX, sync the NSX Security Groups that represent data center endpoints and services in the AirWatch Console. This action shares datacenter logic with VMware AirWatch. Then, configure and install the VMware Per-App Tunnel. This server establishes the secure connection between mobile applications and the network. Next, configure a Per-App VPN profile to directs managed applications to specified endpoints. Finally, configure applications.
VMware Tunnel Application
Device communication with the VMware Per-App Tunnel server goes through the VMware Tunnel application. Without this application, a per-app VPN connection cannot establish. Therefore, the VMware Tunnel Application is the most important application to configure and deploy.
The other applications you configure depend on the specific scenario and use case, but are generally the apps that end users accesses internal resources from. When configuring these apps, consider using Assignment Groups within AirWatch Console to control access on a user level.
Plan VMware NSX Implementation
- Determine the types of devices accessing your network
- Identify the endpoints (apps) in your network access.
- Group applications by level of vulnerability/risk
- Define the security requirements for each level of access.
Install VMware NSX for vSphere 6.1.x+
- Designate a separate network range for each Security Level to identify incoming traffic
- Define IP set-based Security Groups in NSX
- Define internal resource based Security Groups in NSX
- Determine firewall rules for Security Groups
- Identify application endpoint addresses
- Set traffic routing patterns
Meet VMware AirWatch – NSX Integration Requirements
- AirWatch Admin Console v8.3+
- AirWatch Tunnel server using the Linux Installer. The AirWatch Tunnel virtual appliance deployment method is currently not supported for NSX integration.
- AirWatch Cloud Connector (For SaaS Customers)
- Managed Android or iOS devices
VMware AirWatch – NSX Integration Steps
This post highlights the configurations most important for VMware AirWatch integration with NSX. For comprehensive instructions in AirWatch Console v9.1, click the suggested links.
Step 1: Configure and Download the Linux Installer for VMware Per-App Tunnel
Available VMware Tunnel Features:
Micro-Segmentation with NSX requires NSX integration and installation of the Per-App VPN component. However, other configuration options remain. Available features include: access log integration, SSL offloading, enterprise certificate authority integration, and more.
Then, use the configuration wizard to go through the installer settings step-by-step. Next, download the installer from the AirWatch Console, for use during Linux server installation. Please note, changing the details in this wizard creates a new configuration, and requires a reinstall of the VMware Tunnel.
AirWatch Console Configurations:
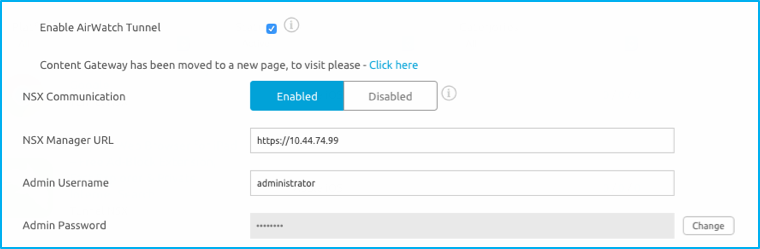
- Navigate to Groups & Settings > All Settings > System > Enterprise Integration > VMware Tunnel > Network Accessibility.
- Select Enable AirWatch Tunnel.
- Click Enabled for NSX Communication and provide the NSX Manager URL and Admin Username and Password.
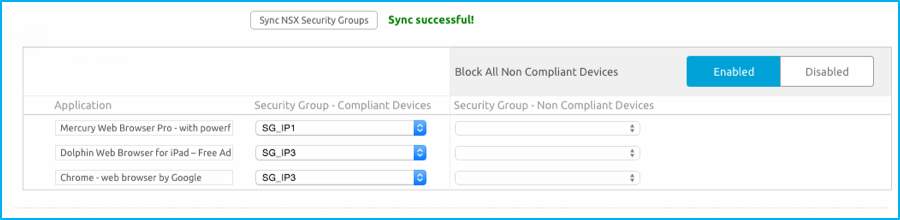
4. Sync Security Groups and block all non-compliant devices from the same configuration screen.
5. Select Download Linux Installer. This button downloads a single TAR file used for deploying the relay and endpoints.
6. Select Save.
Step 2: Install VMware Per-App Tunnel with NSX Enabled
During VMware Tunnel configuration, you specify whether you are installing in a multi-tier or single-tier configuration.
- For multi-tier configurations, continue with the Install the AirWatch Tunnel Front-End Server(Linux) steps.
- For single-tier configurations Install the VMware Tunnel – Basic (Linux).
Important: After accepting the licensing agreement during installation, specify the components to install. Enter 1 to install Per-App Tunnel only.
Step 3: Create a Per-App VPN Profile
AirWatch Console Configurations
- Navigate to Devices > Profiles > List View > Add.
- Select the appropriate platform (iOS or Android).
- Configure a VPN Payload.
- Set the Connection Type to AirWatch Tunnel.
- Select the Per-App VPN Rules checkbox.

Step 4: Configure VMware Tunnel App

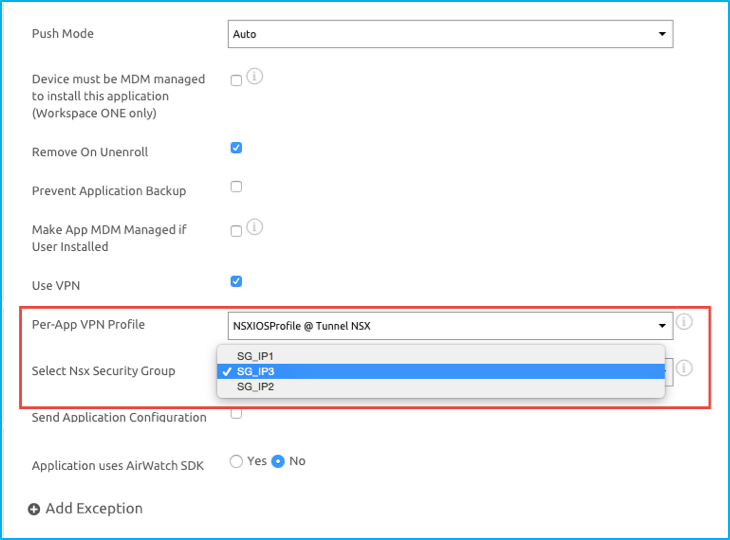
Step 5: Apply the Per-App VPN Profile and Security Group Mapping to Apps
On the application configuration screen, select the following options:
Learn More About VMware AirWatch – NSX Integration
To learn more about VMware NSX, check out the links below:
- NSX product page
- Next Generation Security with VMware AirWatch and NSX Integration Webinar
- NSX Integration Hands On Lab (All Labs > AirWatch – NSX Integration)
- VMware AirWatch and NSX Integration External FAQ
- VMware AirWatch and VMware NSX Integration Guide
Because you liked this blog:
- VMware NSX Micro-segmentation Day 1 Book Available!
- New! VMware 2016 State of the Digital Workspace Report
- Challenges & Benefits of Digital Workspace Transformation: Q&A with VMware’s Shankar Iyer
The post VMware AirWatch – NSX Integration appeared first on VMware End-User Computing Blog.